


Industrial Design, Mechanical Engineering
NAMIKO: AN IKEBANA VASE
Namiko means child of the waves in Japanese. This was my project for ME203, a design and manufacturing class at Stanford. I fell in love with the sand casting process and its ability to create organic forms with inorganic materials. I wanted to showcase the beauty of the material and capabilities of the manufacturing process. Read about my design journey here.
In ME203, we learned about and applied basic manufacturing processes including but not limited to milling, turning, sand-casting, brazing, welding, sheet metal cutting and stamping, and finishing. The final project of the quarter was a product of our choosing using one of the above processes. Namiko's main manufacturing process was sand-casting. Secondary processes used were milling, wood turning, and finishing.
Processes
Major Challenges
-
Clay Prototyping
-
ShopBot CNC
-
Solidworks - Advanced Surfacing
-
Pattern Making
-
Sand-Casting
-
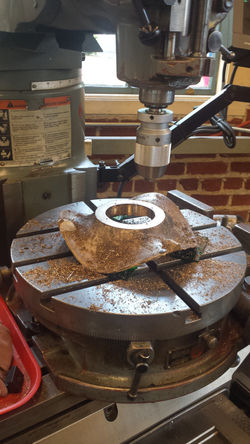
Mill + Rotary Table
-
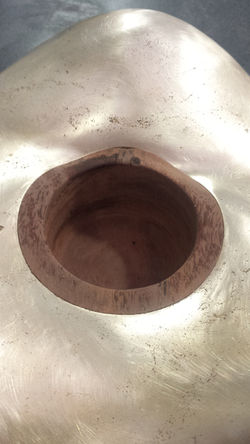
Wood Turning
-
Finishing
-
Part-Flip: The ShopBot CNC machine is great but has limited functionality. It does not have the capabilities to find edges on a given piece of material. The origin is solely defined by the coordinates assigned by the computer. The problem we encountered was how to keep my part aligned once I flipped it. Since no one had ever done a part-flip on this machine before, with some guidance from Bud, the shop guru, I managed to develop a procedure. This procedure was very successful and I shared it with the teaching assistants who have already put it to use! The procedure is pretty lengthy so it is described in detail in another section below.
-
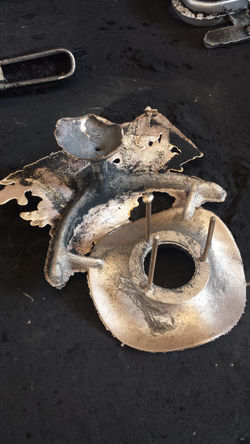
Gating System: My mold had thin edges tapering to about 1/8" all around. We were worried that by doing a standard horse-shoe gate, the bronze would not be able to pass through evenly throughout the part. Instead, we decided to carve a gate and runner right down the middle, digging a trap below the entry way into the part. The theory was that the bronze would fall into the trap first and flow back up to the entry points into the part. This gating method worked fairly well. It needed to be further experimented with however, due to the short term of the course I had to move on. In the end, we decided to turn to the standard horse-shoe gate which surprisingly came out very well despite the abstract geometry.
Clay Looks-like Protoype
 |  |  |
|---|
SolidWorks Model
 |  |  |
|---|---|---|
 |  |  |
 |  |
ShopBot CNC
 |  |  |
|---|---|---|
 |
Pattern Making
 |  |  |
|---|
Sand Casting
 |  |  |
|---|---|---|
 |  |
Post-Machining
 |  |  |
|---|---|---|
 |  |
Wood Turning
 |  |  |
|---|
Glass Cutting
 |  |  |
|---|
Finishing
 |  |  |
|---|---|---|
 |  |
Lessons Learned
Don’t let perfection get in the way of good enough
-
The thing I struggled with most was trying to get things perfect. I would constantly have to stop myself because if I spent any more time on that one step, I would be behind on schedule and would not finish in time. I think I spent a good 4 hours fine-tuning my CAD model and realized that if I kept fixing little things, the bigger objective (actually machining it) would be lost. I also feel that for sand-casting, if I had the time, I would have done about 4 or 5 more tries because I really did want a sand-casted finish but it wasn’t coming out exactly the way I wanted it to. Given the time, I would have experimented with different temperatures, speed of pour variations, and modifications to the center gate. Instead, I settled for sanding and finishing the surface and am actually very happy with how it looks.
Loop in a colleague to check your work
-
I was on schedule when post-machining my part. I finished post-machining and realized I forgot to take into account the diameter of the tool! This meant that the diameter of the center was way too big and it was not going to work with the geometry and fixtures I had planned to join the wooden bowl. This set me back by two days because I had to repair my mold and create a new follow block that broke in the last ramming process. My last two sand-castings had not come out so well and I was worried that I would have to ram up a few more times to get a satisfactory piece. Fortunately, we tried a new semi-circle gating system the final ram and it gave me the best results. Having a fresh set of eyes to double check your work and thought process is immensely helpful because sometimes you'll go into auto-pilot and miss a critical detail.
Fully understand how a machine works, don’t assume
-
While using the ShopBot, I had checked the tool during the part-flip.When returning my tool to the center, I had typed in the x, y, and z coordinates all at once. I thought it was going to move in the z direction first, then move in the x y direction to center avoiding my part. Unfortunately, it moves them all at the same time. The tool moved in a diagonal manner that caught my part and sheared my material and fixturing completely off its placement. I attempted to return it back to it’s original position but I was about an 1/16th of an inch off and it took off too much material on certain edges.
Part-Flip Method
-
We decided to use the Shopbot's V-Carve program to drill two holes, equidistant from the computer origin, through the material and base plate and align it with dowel pins. This way, it would create a center axis in which we could safely and accurately flip the part. In order to do so, there were two key problems:
-
The first was the endmills on hand were not very long. They definitely could not drill all the way through a 4" piece of wood plus another 1" base plate. I was on a budget and did not want to buy a specialty endmill.
-
The second was that I would need 5" screws to secure the wooden block to the base plate. I was not about to put this off another day to find the screws. Plus, even if I found the screws it would still not solve the first problem.
-
-
Given the two previous problems, we decided to insert a second base plate; an intermediate layer between the material and the base. This way I could secure the material to the intermediate plate from the bottom, and then secure the intermediate plate to the base plate from the top. This allowed me to use 1" screws we already had in the shop.
-
The steps are as follows;
-
Set base plate down, secure; set intermediate plate centered over base, secure; and set origin over the center of the two plates
-
Use V-Carve program to drill appropriate guide holes (depending on the dowel pins you use) through both plates. (Only go half way through base-plate so that you don't damage the bed)
-
Detach intermediate plate from the base plate and secure material centered over the intermediate plate
-
Using dowel pins align the intermediate plate and base plate and re-secure Note: Mine were 1-1/2" because they only need to go through the base plate and some of the intermediate plate
-
With the material on top, drill the same exact guide holes on the top of that material- they only need to go in about an 1"
-
Run 1st Operation for part.
-
Detach the intermediate part from the base, detach the material from the intermediate layer and flip over the axis created by the dowel pins
-
Using another set of the same diameter dowel pins, align the holes in the intermediate layer and the ones that you had drilled on the top of the material (now the bottom) and secure.
-
Place on base plate, re-align using initial set of dowel pins and secure.
-
Mill 2nd Op.
-